Maintenance
How Halifax salt air changes masonry and window care
Historic-home renovation in Halifax means fighting salt air on mortar, brick and windows, with a coastal maintenance routine timed to the seasons.
What to take away
- Historic-home renovation in Halifax starts with accepting that salt air, not frost alone, drives how fast mortar, brick and wood give out.
- South End streets and the waterfront heritage districts take the worst of it: wind-driven salt, fog, and freeze-thaw in the same week.
- Repointing with the wrong mortar, usually a hard Portland mix, damages soft historic brick faster than leaving the joint alone.
- Windows need different care than inland owners expectsalt film, corroded hardware, and swollen sashes are the usual failures.
- A coastal maintenance routine works best when it follows the seasons, from a spring wash-down to a post-storm inspection in late autumn.
- Heritage permits and provincial programs shape what you can change, so check before you buy materials.
How salt air changes mortar, brick and wood in Halifax
Salt does not eat masonry the way acid does. It moves. Airborne chloride lands on the wall, dissolves in fog or rain, and soaks into the pore structure of mortar and brick.
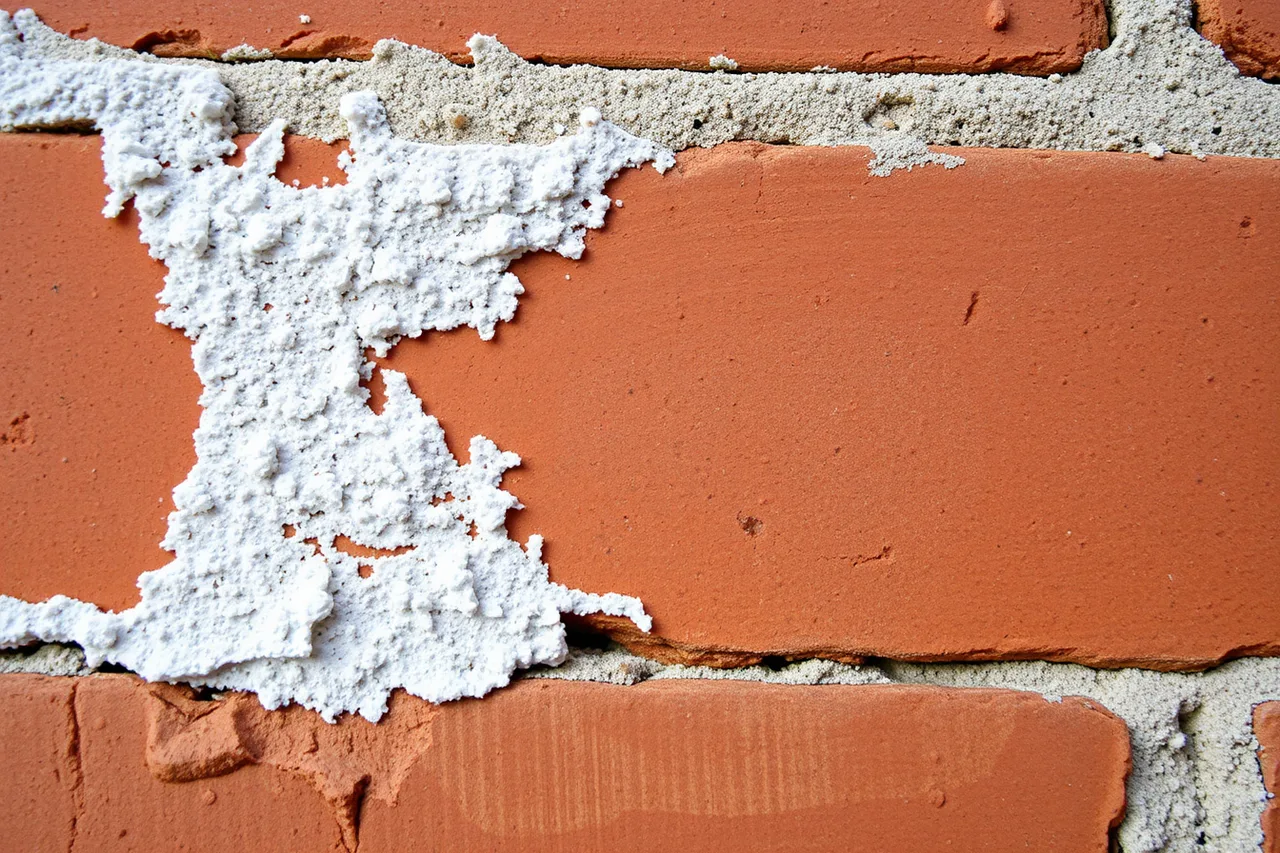
When the wall dries, salt crystals form inside those pores and push outward. Masons call it salt fretting. You see it as a sugary, crumbling surface on the mortar joints and the face of softer brick.
Halifax adds freeze-thaw to that cycle. A south-facing wall can be wet and above zero at noon, then frozen by midnight. Water in the pores expands, the salt load rises, and the surface spalls. This is why a wall that looks sound in June can shed flakes by February.
Wood behaves differently but suffers the same exposure. Salt draws moisture into end grain and into any exposed joint, and it corrodes the nails, screws and hinges holding trim and sashes together. Rusted fasteners stain the wood and lose their grip.
For a broader look at how climate decides which materials last, see heritage home renovation grants canada. The principle holds across Canada, but the coastal version is faster and less forgiving.
South End and waterfront heritage districts: what the exposure looks like
The Halifax South End has a particular combination that inland Nova Scotia does not. Streets such as Barrington, Young Avenue and the blocks around the Public Gardens sit close enough to the harbour that onshore winds carry salt spray over the roofs. Fog sits on those walls for hours.
Waterfront heritage districts, including the historic properties along the harbour and the older commercial and residential stock near the water, get the highest chloride load. Buildings there face wind-driven spray directly, and their walls stay damp longer because fog and humidity slow drying.
Exposure is not uniform. A house on a sheltered north-facing lot two streets back from the water fares better than one with an unobstructed southwest face. Topography matters too: properties on the higher ground of the South End catch more wind than those tucked behind a ridge or a row of mature trees.
Snow cover offers partial protection in deep winter, but it also holds moisture against the base of the wall. The salt already in the masonry stays there. Spring melt re-dissolves it and the cycle restarts.
Mortar choices that survive coastal air
Historic brick in Halifax is usually softer and more porous than modern brick. It was designed to shed moisture through the mortar, which was made with lime. Lime mortar is sacrificial: it flexes, lets the wall breathe, and gives way before the brick does.
Replacing that with a hard Portland cement mortar traps moisture in the brick. The brick then spalls, and repointing becomes a recurring cost rather than a once-in-a-generation job. For coastal work, a lime-based mortar matched to the original in strength, colour and permeability is the standard approach.
The mix matters as much as the binder. Too much cement in the mix, or an over-sanded blend, produces a joint that is stronger than the masonry around it. A conservation mason will usually test the existing mortar first, then match it. Pointing should be finished with a slightly recessed profile so water sheds rather than sits.
Repair products carry their own hazards. Lime burns skin and eyes, and some masonry cleaners and water repellents contain solvents or acids that need ventilation and gloves. The CCOHS chemicals reference is a practical starting point for reading safety data before you open a pail.
Before specifying any replacement material, confirm what the heritage permit allows. Provincial heritage programs and municipal heritage registers set the rules, and the Department of Growth and Development is the provincial entry point for heritage and Atlantic development programs.
Matching mortar in three steps
- Take a small sample of the existing mortar from a hidden joint and have it analyzed for binder type and aggregate.
- Specify a lime mortar that matches the original in strength and permeability, not one that matches it in colour alone.
- Repoint in mild, dry weather and keep the joint damp for the first few days so the lime cures instead of drying too fast.
Window care in a salt-air climate
Windows fail earlier on the coast, and the reason is usually the hardware, not the glass. Salt corrodes hinges, sash weights, pulleys and locks. Once a hinge stiffens, the sash is forced, and the frame racks. That is when wood joints open and water gets in.

Wood sashes need paint on all six faces, including the edges and the parts you cannot see when the window is closed. A painted face that is intact sheds salt-laden water. A cracked or chalky face absorbs it. Check the bottom rail and the sill first, because that is where water sits.
Storm windows and exterior shutters help, but only if they are maintained. A loose storm window rattles, admits driven rain, and traps moisture against the primary sash. Fitting them properly in autumn and removing or venting them in spring is part of the routine.
Do not seal a historic wood window tight with modern caulk and foam to stop drafts. Old walls and windows need to dry inward. If you block that path, moisture accumulates in the frame and the sill rots from the inside. For lessons crews keep relearning, see historic home tax credit renovation costs.
Window care checklist
- Wash salt film off glass, frames and hardware with fresh water at least twice a year.
- Lubricate hinges, pivots and sash hardware with a corrosion-resistant product.
- Check putty and glazing for cracks and re-glaze before winter.
- Test paint adhesion on sills and bottom rails with a light scrape.
- Confirm storm windows are secure but not trapping moisture against the sash.
- Look for rust stains on wood, which point to failing fasteners underneath.
A maintenance routine tied to coastal seasons
Seasonal timing does most of the work on a Halifax coastal home. The goal is to wash salt off before it concentrates, and to repair before freeze-thaw arrives.
Spring is for washing and inspection. Rinse masonry and windows with fresh water and a soft brush, working from the bottom up so you do not push dirty water into open joints. Do not use a pressure washer on historic brick; it drives water and salt deeper into the wall.
Summer is for masonry and paint work. Lime mortar and exterior paint both need mild, dry conditions to cure. This is the window for repointing, sill repair and painting, and it should be scheduled before the autumn rain.
Autumn is for weatherproofing. Clear gutters, confirm downspouts discharge away from the foundation, fit storm windows, and seal nothing that needs to breathe. Late autumn is also the right time for a pre-winter inspection.
Winter is for watching, not working. Freeze-thaw does its damage then, and repairs made in cold, damp conditions usually fail. Note problems and plan them for spring. A fuller historic home restoration checklist schedule covers the same logic for inland materials.
Water that reaches the base of a coastal wall is a separate risk. Salt air weakens masonry, but poor drainage undermines it. If you see stepped cracking, a dropping sill line or damp patches at the base, treat it as one of the foundation problems that need attention before cosmetic repairs.
What to inspect after storm season
Halifax storm season runs from late autumn into early spring, and the days after a major system are the most useful inspection window of the year. Walk the building with a notebook and look at the same points every time.
Start at the roof and work down. Check flashings, chimney caps and the mortar at the chimney crown, because that is where driven rain enters first. Then look at the windward elevation, the one that takes the spray, for fresh spalling, eroded joints and cracked paint.
At ground level, check the sill of every window on the exposed side, the base of the wall, and the ground slope away from the foundation. Look for new rust stains on wood and masonry, which signal failing fasteners and water where it should not be.
Record what you find and photograph it. A crack measured this year tells you whether it is moving next year. That record also helps when you apply for a heritage permit or a provincial grant, because it shows the work is maintenance rather than alteration.
Post-storm inspection checklist
- Flashings, chimney caps and crown mortar.
- Windward wall for new spalling and eroded joints.
- Window sills, bottom rails and glazing on the exposed side.
- Rust stains on wood, masonry and hardware.
- Gutters, downspouts and discharge points.
- Ground slope and any new damp patches at the base of the wall.